
Bitcoin Payments API — 101
Website administrators/developers looking accept bitcoin payments are overwhelmed by terms like blocks, txid, address, HD wallet, private…
Website administrators and developers who want to accept Bitcoin payments are often overwhelmed by complex technical terms like blocks, txid, addresses, HD wallets, xpub, and private keys. In this post, we provide a clear 101 guide on the entire process by walking you through the basic workflow step by step.
All integration steps and API processes mentioned in this article are directly referenced from the official Blockonomics Developer Documentation at https://developers.blockonomics.co/.
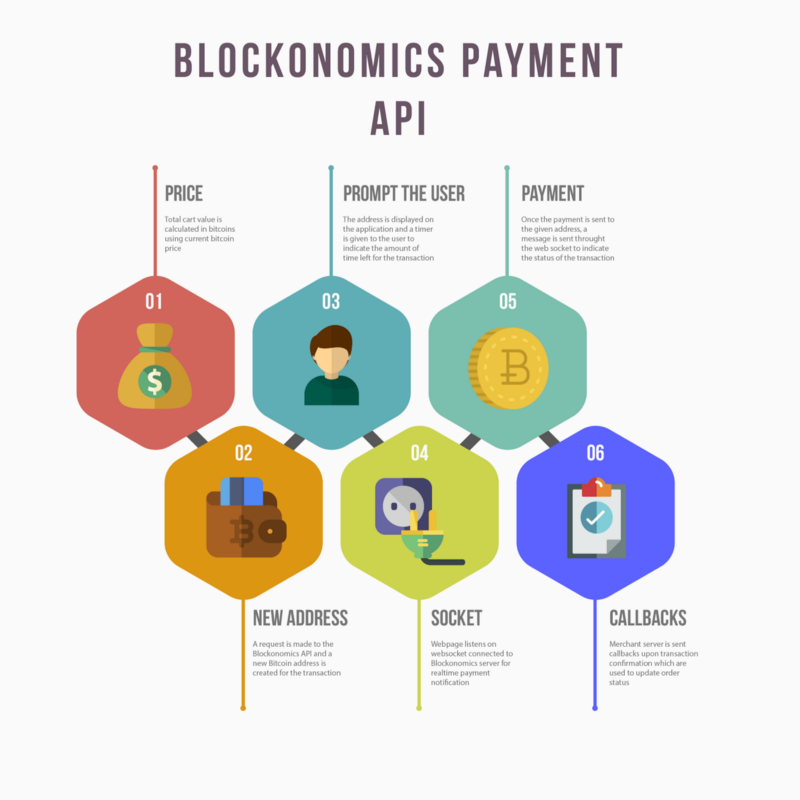
Payments API — full size infographic (Click here)
- Price: Calculate total amount of the order in BTC. This can be done by dividing the order/cart value by current bitcoin price. Since bitcoin price is fluctuating, there is time window within which we want to customer to pay these bitcoins. Most merchants provide a window of 10–15 minutes
- New Address: Generate a new bitcoin address. This is used to receive payments. Must be unique per order
- Prompt the User: Show the customer bitcoin address with qrcode/btc amount to which he can make the payment. Show a timer to indicate time left to make payment
- Socket: Webbrowser opens a websocket connection to server to listen to realtime notification of bitcoin payment and redirects customer to order confirmation page on notification.
- Payment: Customer makes payments through his/her bitcoin wallet
- Callbacks: Server gets notifications of payment confirmation and status of order is updated
Setting up your account
- Crypto Wallet: You would need an existing crypto wallet to use Blockonomics. For bitcoin we recommend electrum.
- Signup / Authentication: Create a Blockonomics account by signing up here. All API requests require an APIKey. The details on how to get an APIKey are available in the Authentication section.
- Tracking Bitcoin: Once you have a wallet, you can buy bitcoin at popular exchanges or receive it from friends. Feel free to use our search tool. You can then use our Search API to track the wallet balances/transactions programmatically.
- Receiving Payments: Now visit Receiving Payments to complete setup for accepting crypto payments.
Authentication
Set up the authentication for your API to help users manage their credentials.
API Key Quick Start
API keys are your gateway to interacting with the Blockonomics API. Setting up is easy and quick, allowing you to get started with your integration effortlessly. Here’s how you can begin:
- Locate Your API Key: Navigate to the Blockonomics' dashboard under the "Stores" section.
- Copy the Key: Select the API key provided and copy it for use.
- Authenticate: Include your API key in the Authorization header of your requests. This ensures secure and authenticated access to the API.
With these steps, you're ready to explore and utilize the features of Blockonomics API. Make sure to keep your API key confidential and never expose it publicly.
Regularly rotating your API keys is a best practice to enhance security and reduce the risk of unauthorized access. Follow these steps to safely rotate your keys: https://developers.blockonomics.co/reference/authentication-1
Receiving Payments
You need to complete the below steps to start receiving payments. For more details, checkout: https://developers.blockonomics.co/reference/receiving-payments
1. Add a wallet
- Click Wallets.
- Click "Add a wallet".
- Select what type of crypto currency you want to use for your wallet.
- Fill out the wallet form and click "Create wallet".
2. Add a store
- Click Stores.
- Click "Add a store".
- Fill out the store form and click "Create Store".
- Enable crypto on your store and select the desired wallet.
Set callback URL on which you want to receive payment callbacks. If you are doing dev on localhost you can use ngrok to get a callback.

Sample store with BTC payments enabled
Overview
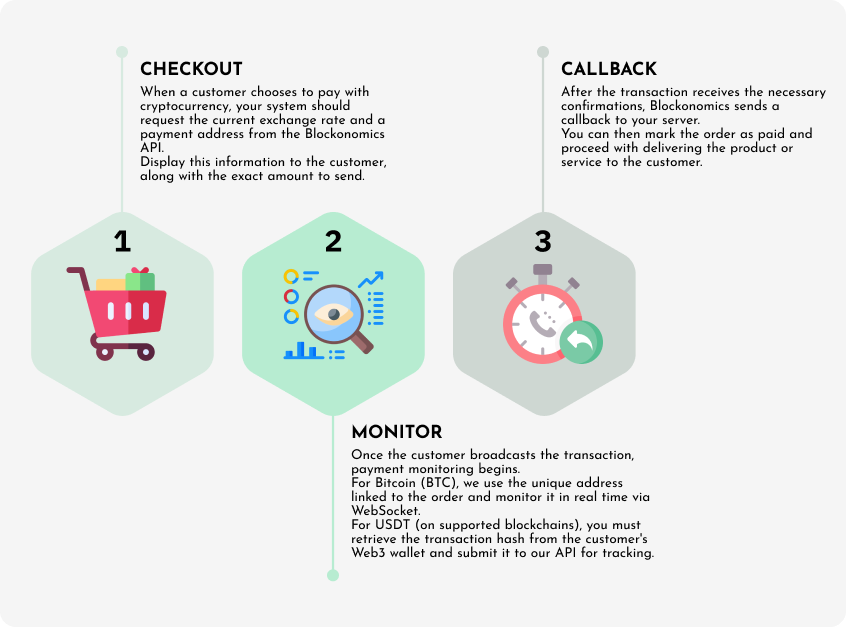
Overview of stages in Blockonomics Payments API
Blockonomics Payments API provides a unified API to receive crypto payments. Overall the stages - Checkout, Monitor and Callback are the same for both BTC and USDT payments. There are minor nuances/differences which are detailed below.
BTC Payment Flow
Checkout view
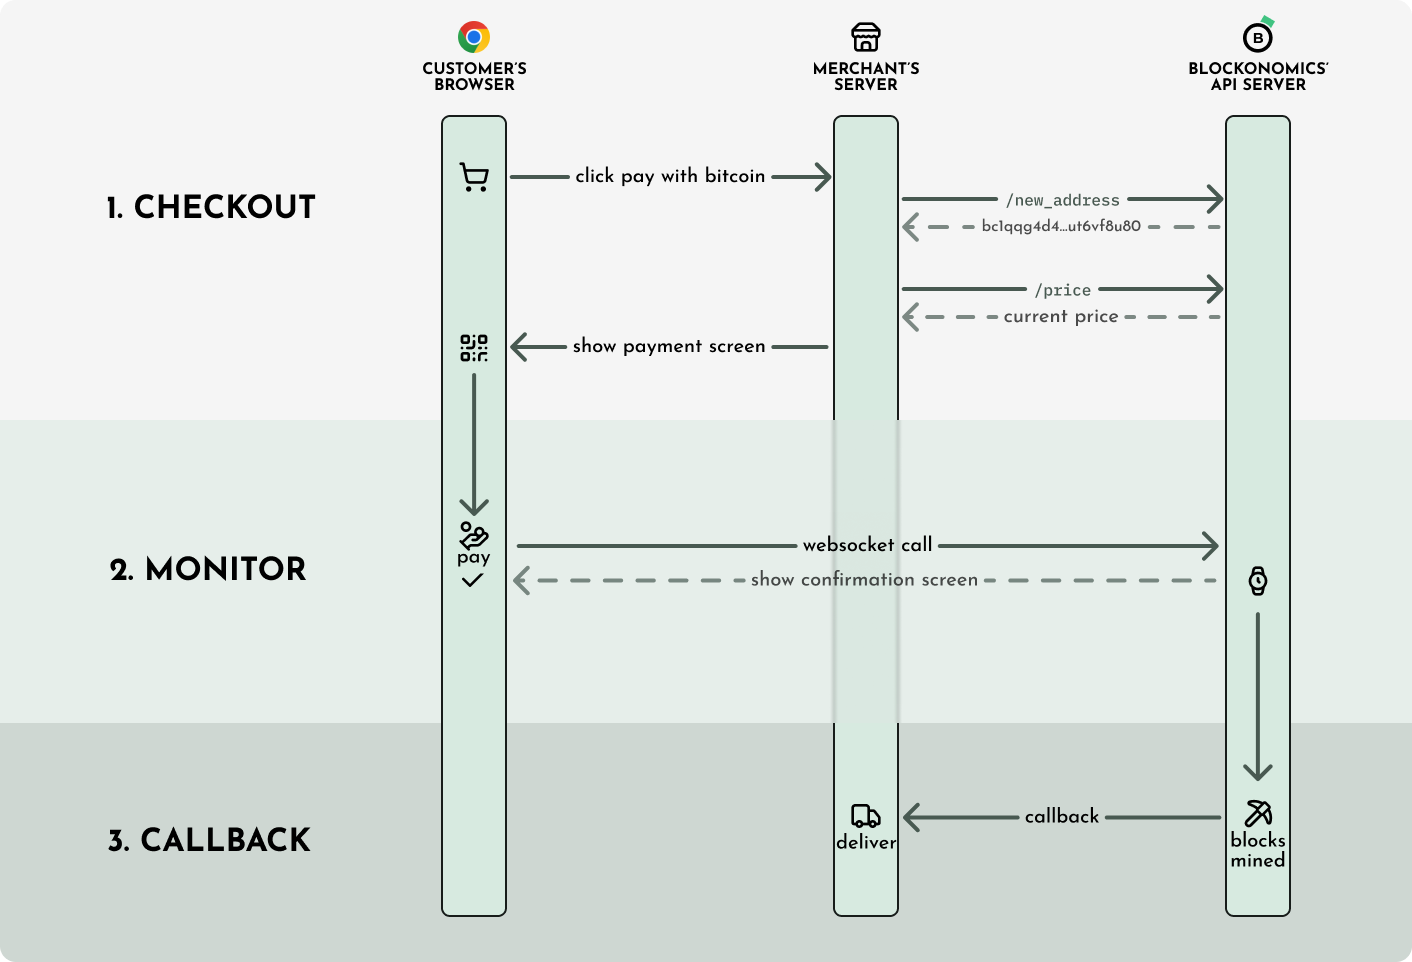
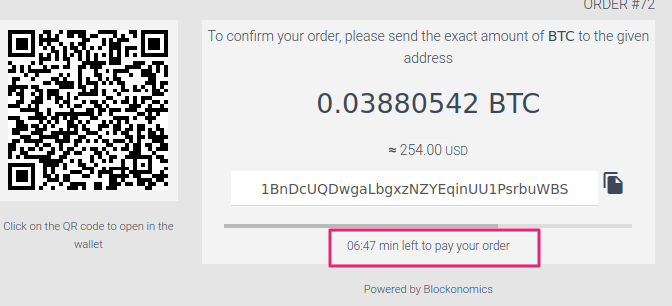
As customer does checkout, he is shown the cart value along with a unique bitcoin address/amount to pay. The merchant server must call Create or Get Payment Address and Fetch bitcoin price endpoints.
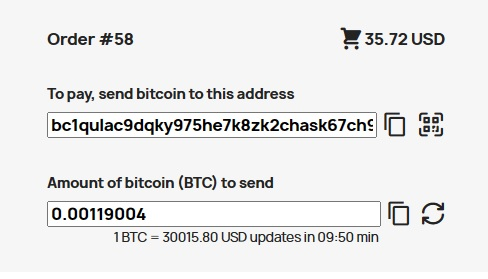
An example bitcoin checkout UI
It is a common misconception that the customer has to pay within the alloted 10/15min else the bitcoin address will expire. This is incorrect, bitcoin addresses generated by the Blockonomics API never expire. The time period is only to lock in the price, so that the customer gets a discreet bitcoin amount to pay. In case of bitcoin it is always recommended to generate a unique bitcoin address for each checkout.
Monitor
Customer sends bitcoin as indicated in the checkout from his bitcoin wallet. Now since bitcoin confirmations take time (1 hour - 1 day), we cannot ask the customer to stay on the checkout page for a day waiting for block confirmation! Instead, the customer is shown an order confirmation screen as soon as the unconfirmed payment is detected. To detect the unconfirmed payment, use the Receive payment notification websocket call.
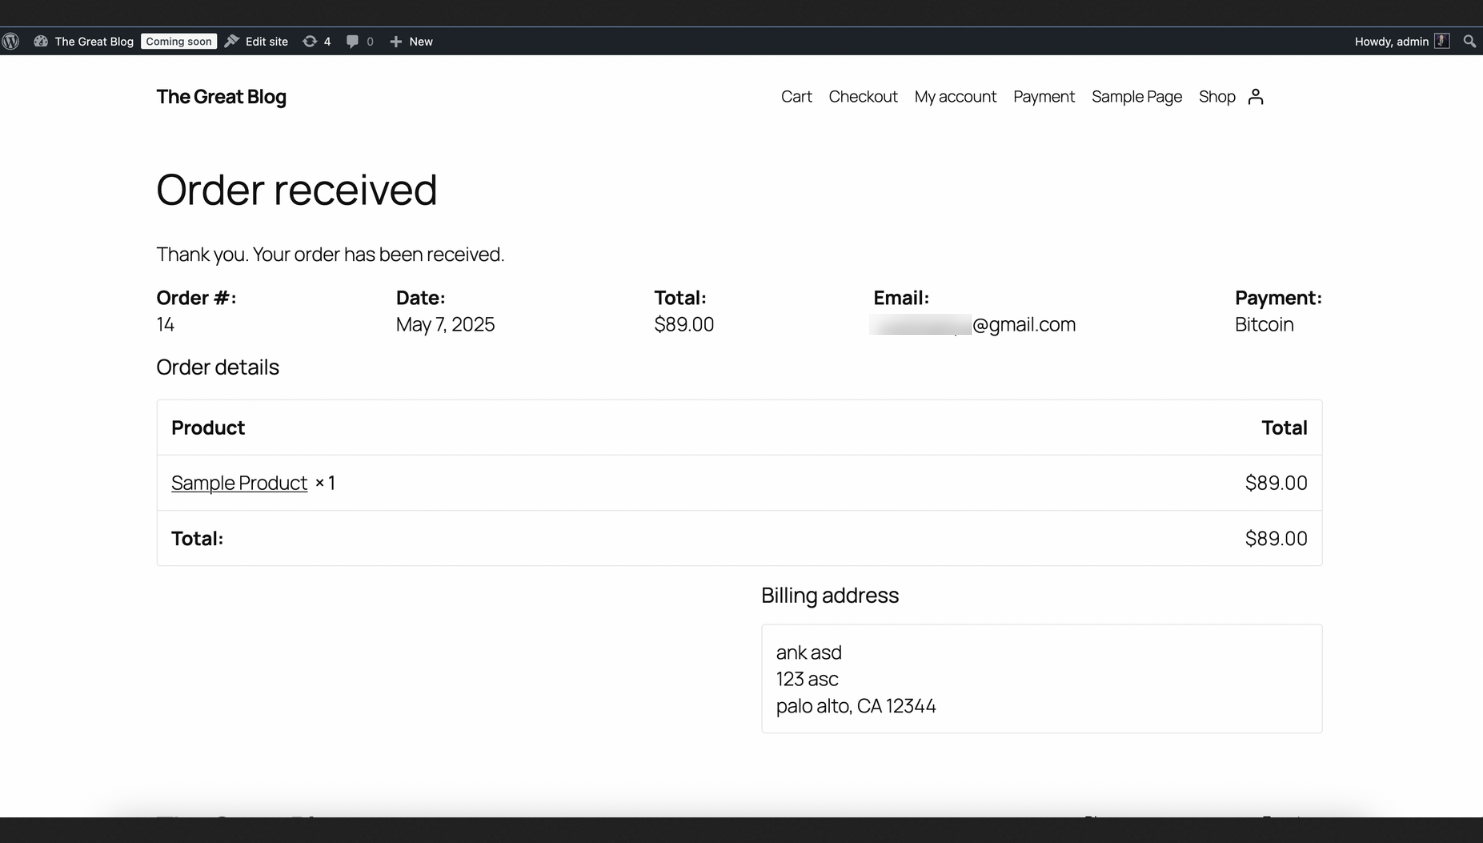
A sample order confirmation screen that can be shown to the customer
Callback
Merchant server will receive a Callback Notification when the bitcoin transaction gets confirmed. Now the customer order can be marked as paid and the product can be delivered.
Integration Tips
Order Information
Blockonomics doesn’t send order information/extra custom data in HTTP callback. You must keep track of order information in database by associating each order with a unique bitcoin address. This way when you get payment callback, you know which order you got payment for.
Here is an example of order table schema in DB:order_id (integer): Keeps track of order id
tx_id(long int): Transaction id of received payment
address(string): Unique bitcoin address for receiving payment
value(long int): Expected bitcoin amount in satoshis
Address Reuse / Expiry
In Blockonomics addresses never expire. You can receive unlimited amount of BTC/transaction to a single address. You will keep receiving callbacks to address, even if payment is done days/months after the address is generated. Also, Blockonomics can handle 1000s of addresses and there is no need for you to add complex logic to reuse addresses. If you are a large shop with thousands of orders per day, it is only recommended to increase gap limit to avoid fee
Payment Timer
It is a recommend practice to show payment timer during checkout. Payment timer is used to lock in the bitcoin price for sometime so that customer can pay exact bitcoin amount. A time from 10–30 minutes is recommend. It is not recommend to have large time periods. Sometimes bitcoin price may fall by 20–30% in 12 hours which will result in losses for you. So, if the invoice hasn’t been payed for a while you should refresh the invoice so that it reflects the updated USD/BTC price
Invoice Status
When you receive HTTP callbacks for payment, you should update invoice status on your server accordingly. On client/customer side, a simple way to do is to keep polling server invoice endpoint for status.GET btcshop.com/api/status?invoiceid=8123
GET btcshop.com/api/status?invoiceid=8123
GET btcshop.com/api/status?invoiceid=8123Busy polling on browser for invoice status
Polling works however is resource intensive. A better way is to use our websocket API. Invoice status from server can be fetched again only when realtime payment notification is receivedvar socket = new WebSocket(“wss://www.blockonomics.co/payment/"+ address);
socket.onmessage = function(event){
response = JSON.parse(event.data);//This condition ensures that we reload only when we get a
//new payment status and don't go into a loop
if (response.status > invoice_status)
setTimeout(function(){window.location.reload() }, 1000); }
}//The current location (invoice page) is reload only upon websocket //notification of payment.There is timeout to let the invoice status //update on server via HTTP callback
Payment Confirmations
Always wait for one or two payment confirmation before delivering your product
Don’t accept zero confirmation/unconfirmed payments as they can be easily cancelled or reversed
If you still need to accept unconfirmed payment accept non RBF payments.
Resources
- Blockonomics Payments API
- Angular library to generate QR Codes
- BitcoinJS — Bitcoin-related functions implemented in pure JavaScript

Comments ()